Putting together my video wasn’t as easy as i thought, 30 secs is not a long time, i had to cut all my videos so 1 sec or 2 secs, i had to choose what parts i wanted to show and that took ages, i loved the whole video i didn’t want to cut out anything. When i got my first critique i was told to show the stages of working and not just showing the work randomly, i thought that was a good idea. I redid my video and i thought about the sound so much, i didn’t know what sound i should use that would work with my bumper. At first i didn’t want the actual sound because i heard it so much i got bored of it but nothing would go with my video. I waited until the final min so just decide that i will be sing the actual wood cutting sound. Hearing it on the projector made the sound more interesting and i am happy i stuck with it. I tried so make the video more interesting by making some parts reversed but it didn’t look reversed, it just looked like the guy was left handed so it made no sense to reverse it. I am so proud of this video and of this project, it was really interesting and fun to make, i always hated making videos but i loved doing this, i learned what a bumper is and i saw so many interesting videos on youtube from some weird people.
Filming day
I started taking sample videos in the woodshed here in VCUQ, I didn’t get the effect i waned because the wood shop here is so clean and there was not one working there at that time. I waited until i could go to the real wood shop that i wanted to to start filming, it was so hot that day but i had no choice but to film. I started filming everything they were doing, all the machines used, there were also some machines not being used so i asked them to use then just so i can film it and they were kind to listen to me. When i got all the million shots i needed it was time to go home. It was really fun filming, i didn’t expect to enjoy filming for this project, but maybe because i liked my idea and the place i was filming i enjoyed it.
Bumper
When this project was introduced we were asked to look at examples on youtube from famous people who i can’t remember the names of now, I started looking for interesting stuff and i found one with so many colors and weird shapes, i fell in love. I also saw a video where this guy went to an old place and just started filming random things there for a few seconds each, oddly i found that interesting, i just stared at the video until it finished, i thought that i want to do something like that. I wanted a place where there was movement and sound, I thought about the desert but there was no movement or sound there so i crossed that off, I started asking around for places with interesting movement but i didn’t like any ideas people gave me. I remembered i went to a wood shop and i thought it would be a great place to film.
This was some of my research videos
I love the weird colors and shapes here.
I love how this video works out.
This is my favorite.
Final Zine
I asked a non graphic designer what she thought about my zine and her first response was it was too white, I should add a bit of color to it. I thought about it and I added a green page, I also added a spread of a garden picture, so I thought okay my zine now has a bit of color, I didn’t want every page colored so it wouldn’t be repetitive. I redid my zine a million times just to make it neat and easier to print and scan. At first I had fun making it but when I redid it a million times I hated it, I’d rather just work on a laptop, I feel like the zine taught me how to work by hand and what to achieve and I might use it in the future if I ever wanted to achieve a specific look.
Process
Starting out with my zine I first started searching for articles and pictures to put in my zine, I didn’t want to find one article and start with the zine, I wanted to find everything then I would arrange since this is a diy project. I printed everything out and I started placing articles and pictures on top of each other until I got something I was happy with. This was a long and messy process, I had to then start cutting and sticking my articles to the pages, at first I made my spreads one sided each so I can see everything and I figured when I was fully happy I would then make a new one back to back to make a booklet, this was not easy. I had to make so many copies of the same thing so I could make it neat and clean. I then tried to experiment printing the first pages and this was hell, it would never be in the middle and when I folded the pages they would never align, I’m gonna leave this problem aside until next week when it’s due because right now I have to focus on finishing my zine and getting feedback.


Fanzine Research
I found a website on fanzines to get to know them better.
https://www.bl.uk/20th-century-literature/articles/fanzine-culture
The website has two fanzines and it reminded me of comic books or collages.
I found this youtube tutorial on an easy way to make a fanzine and i found it helpful
I found this youtube video on fanzines done about london, it explains that fanzines are just like magazines but done by ammeters, it looks more collagy.
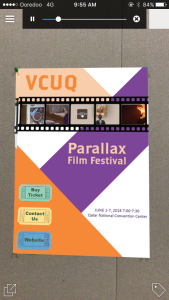
Final Parallax Poster
I didn’t know how to use the layer app and this is the first time i hear about it, but it was exciting to see what i can do with on set and off set posters. The app was not very challenging, it was simple and straight forward and i like this about it the app (smart design). I designed everything on illustrator and saved it as PNG so i could use it for the on the app, I made a lot of different versions of what i wanted to see on set and i thought it would be nice to make it less crowded so i removed the big tickets and used them for the information people could click on to contact or email the venue.
I needed help with the carousal because this was very new to me but when Law showed me how to do it was so simple and easy and fun. I used a scene from everyones video and i still had an empty space in the fourth carousal so i thought about what i should put in there, i finally used a ticket that says “Enjoy!’ on it, i thought that is a good idea because my poster is all about the tickets and whenever i go see a movie everyone says enjoy.
Finally we had to publish our on set so we could scan it anytime we wanted, I am happy with both my on set and off set, the colors on the poster are a little faded so when someone scans it it appears more brighter. This was a really interesting project, knowing that these things exist and knowing how to use it will really benefit me in the future.


Final Kinetic Type Video
While working on my video i faced some challenges, I had a hard time making the type come in and out in an interesting way, but with some feedback from my professors and other people it became easier. I heard the scene and i imagined how the words would react like when he says disappearing the word actually disappears.
I tried my best to listen to the breathing and footsteps and match the color changes of the video, at first i chose a really dark color so it was barley noticeable, my professors couldn’t see it so i had to change the color to a lighter black, it still does the job.
This project was really fun to do, i expected it to be fun but when working on it at first i hated myself, but with time i really enjoyed working on it, I am so happy with the final result, i feel like i made a music video but without the music, it reminded me of when i was younger i would make similar kids of videos but for songs, it wasn’t as good as this but i used to have fun doing it.
Kinetic Type
We had to chose a movie scene thats maximum one and a half minute long, i chose a scene from the movie “Passengers” because the tone of voice change in the scene so i could have fun doing the type in this scene.
When i started doing the actual project i found out it wasn’t as easy as i thought it would be, the first word looked interesting but then i had a hard time with the other words, i had to write each word in a separate row and move each one separately, i thought this was gonna take forever. I stopped thinking and i just worked on writing all the words then it became a bit easier to work with, there were some sentences which i didn’t like but i didn’t mind them very much because i knew i will change them later. there were some seconds where no one was talking and it was just breathing loudly and running so the professors told me to do something with that, i made a 90% black come in and out of the scene to show movement, i still have to work more for the final but i am very proud of the work i did in just one week.
Parallax Poster
We had to create a poster for the parallax film festival, i got excited when i heard about this project. I created several posters and got feedback to combine two posters together. The challenging part about that is finding a nice color palette, I combined the ticket with the colored poster and experimented with color, i printed the one i liked best and got more feedback. After fixing the poster i made another poster to show how it would look on the phone, i am not really happy with it yet but ill wait for more feedback on that.
I feel like i have my final “printed” poster ready and i just have to fix the one on the phone.
This project is challenging because i always had a hard time picking nice color palettes, i like this challenge because i really want to have color palette i can use in the future.


